Salesforce CRM Integration with Data Cloud


How to Connect a Custom Object from Salesforce CRM Org to Data Cloud Org
Streamlining data access between Salesforce CRM and Data Cloud is a game-changer for data-driven decision-making in any organization. By integrating these platforms and connecting custom objects, you can effectively centralize customer data, enhance insights, and unlock the full potential of your Salesforce ecosystem.
This step-by-step guide will walk Salesforce Administrators, Data Analysts, CRM Users, and Developers through the process of linking Salesforce CRM (or Developer Org) to Data Cloud and connecting a custom object to Data Cloud. Whether you’re just starting or need to revisit the setup, we’ve got you covered.
Why Connect Salesforce CRM with Data Cloud?
Integrating Salesforce CRM with Data Cloud allows organizations to gain deeper, actionable insights into their customer data by connecting disparate systems and centralizing information. This connection supports better decision-making, improves reporting, and enhances customer experiences.
Using this integration, you’ll also be able to seamlessly connect custom objects, allowing unique business processes and data to be reflected in your Salesforce Data Cloud.
What You'll Need
- Access to Salesforce CRM or a Developer Org
- Access to your Salesforce Data Cloud Org
- Customer data (we’ll provide a demo dataset below)
Now, let's get started!
Tasks for Salesforce CRM / Developer Org
Step 1: Download Customer Data and Structure It
To get started, we'll use a customer dataset as a base for creating your custom object in Salesforce CRM.
1.a) Download Customer Data
Click on the following link to download the customer data from Kaggle: Customer Personality Analysis Dataset. This dataset provides a valuable and structured set of sample customer data for your project.
1.b) Structure the Data
After downloading, structure the data using Excel or a similar tool:
- Open the dataset in Excel.
- Select the first column.
- Go to the Data tab and click Text to Columns. Follow the prompts to properly format and structure the data.
Step 2: Load the Customer Data into Salesforce CRM
Once your dataset is structured, it’s time to import it into Salesforce CRM by creating a custom object.
2.a) Access Object Manager
- Log into your Salesforce Developer Org or Production Org.
- Navigate to Setup and search for Object Manager in the search bar.
2.b) Create a Custom Object
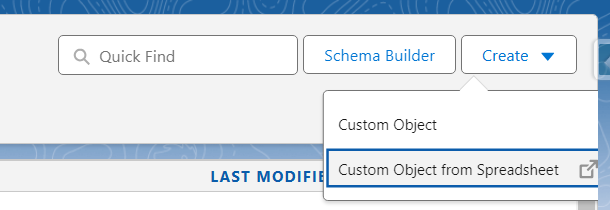
- Click Create at the top of the Object Manager interface.
- Select Custom Object from Spreadsheet.

2.c) Login to Salesforce
- You’ll be prompted to Login to Salesforce.
- Important: Do not log into Salesforce Data Cloud Org yet. Select your Developer Org, Production, or Sandbox, based on your environment.
2.d) Upload Your Spreadsheet
- Upload the formatted dataset you created earlier. Verify all fields match the template.
- Once validated, proceed to create the custom object in Salesforce CRM.
Your custom object—Customer Data—is now ready to be connected to your Salesforce Data Cloud Org.
Tasks for Salesforce Data Cloud Org
Step 1: Connect Salesforce CRM to Data Cloud
Establishing the connection between Salesforce CRM and Data Cloud is essential for syncing your custom object.
1.a) Access Data Cloud Setup
- Log into your Salesforce Data Cloud Org.
- Go to Data Cloud Setup
- Search for Salesforce CRM in the Setup menu.
1.b) Connect to Salesforce CRM
- Click New and choose either Connect to Salesforce Org for Developer/Production Orgs or Connect to Sandbox Org for Sandbox environments.
- Complete the authentication process. Once connected, your Salesforce Org will appear in the Data Cloud setup.
Step 2: Assign Permissions
- Navigate back to your Salesforce CRM or Developer Org.
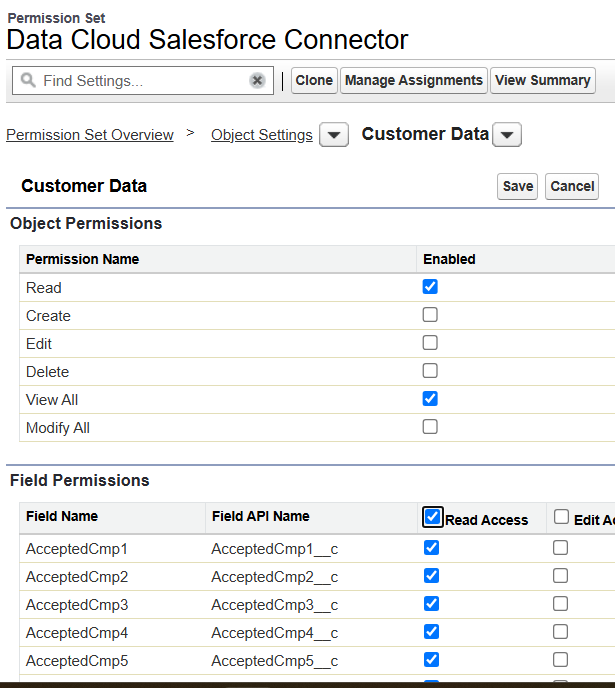
- Search for Data Cloud Salesforce Connector in Permission Sets.
- Assign the View All permission for the Customer Data custom object and ensure field access is set correctly.
Note: This is a critical step—your fields won’t show in Data Cloud unless field access is granted.

Step 3: Create a Data Stream in Data Cloud
3.a) Access the Data Stream Menu
- Navigate to the Data Cloud homepage.
- Go to Data Stream and click New.
3.b) Select Salesforce CRM
- Choose Salesforce CRM as the data source and click Next.
3.c) Add the Customer Data Object

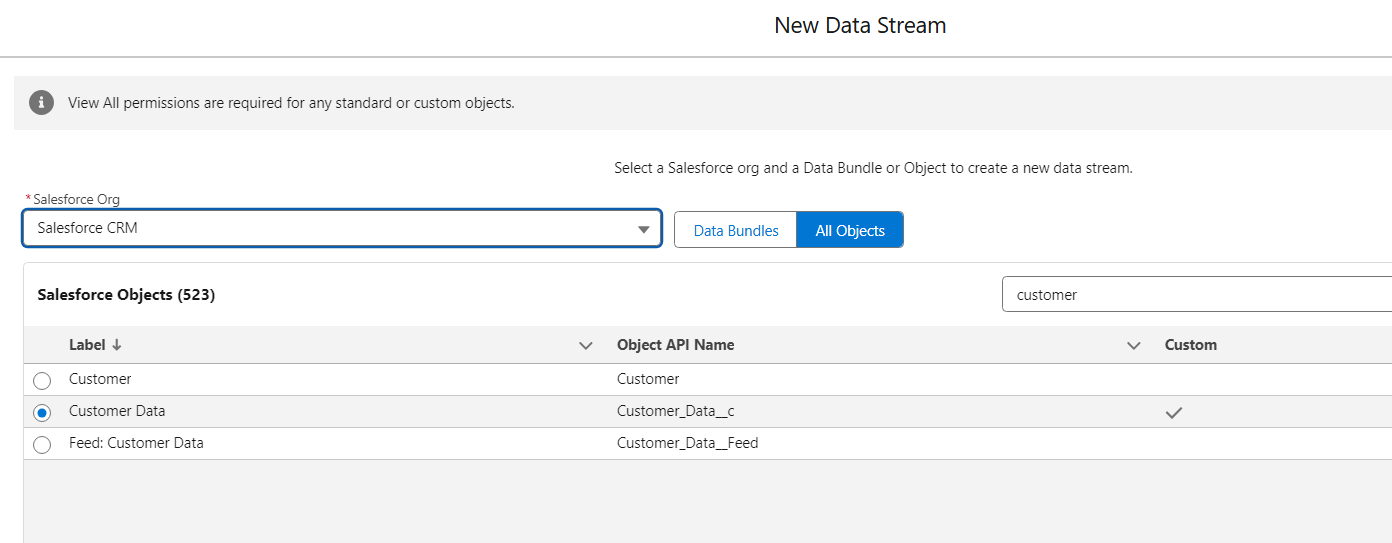
- Select your Salesforce Org connection.
- Click All Objects, search for Customer Data, and add the object.
Step 4: Map Fields and Deploy
- Select the fields from the Customer Data custom object that you want to sync.
- Click Next and map the Profile as Category.
- Choose Default in the Data Space field, then click Deploy.

Congratulations! Your Salesforce CRM custom object is now successfully connected to your Salesforce Data Cloud Org.
Unlock the Full Potential of Salesforce with These Steps
Connecting Salesforce CRM with Salesforce Data Cloud is a strategic move to streamline your data management processes and tap into the full capabilities of Salesforce. By following these steps, you’ve created a custom object, connected it to your Data Cloud Org, and deployed a live data stream.
Through this integration, you can now analyze customer data more effectively, break down silos between teams, and enable more personalized customer interactions.
If you're ready to take your Salesforce ecosystem to the next level, share your experience or reach out to the community with questions. The possibilities are endless when Salesforce CRM and Data Cloud work together!


